How to Control Windows Update Settings to Avoid Forced Restarts Leave a comment
While Windows updates are essential for security and performance, you wouldn’t want them to interrupt your workflow with unexpected restarts. Thankfully, it’s possible to avoid these forced restarts by managing a few Windows update settings.
Set Active Hours
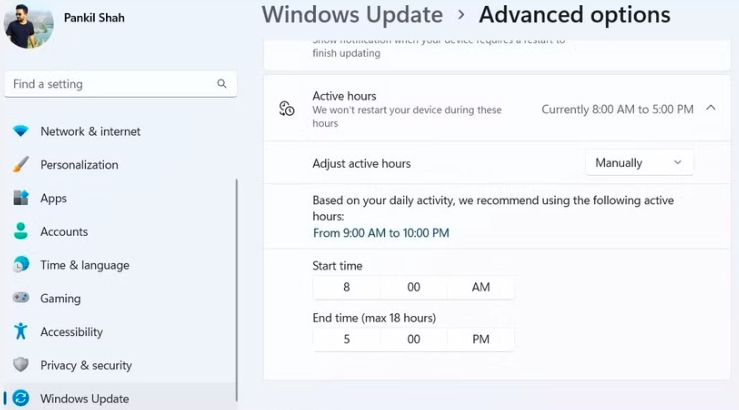
The best way to avoid forced restarts at inconvenient times is by setting active hours in Windows. This feature lets you specify the hours you’re most likely to use your computer so that Windows avoids installing updates during that time.
To set active hours on Windows:
- Press Windows + I to open the Settings app.
- Select the Windows Update tab in the left pane.
- Go to Advanced options.
- Click on Active Hours to expand it.
- Use the drop-down menu next to Adjust active hours to select Manually.
- Specify the hours you usually use your PC in the Start time and End time fields.
Pause Updates and Install Them Manually at Your Convenience
While setting active hours can help prevent forced restarts during specific times, there is a limitation: you can only select a timeframe of up to 18 hours.
This may not be suitable if you need your PC running continuously or if your schedule is irregular and doesn’t fit into a fixed timeframe.
If you want complete control over when updates are installed, you can consider pausing them. Both Windows 10 and Windows 11 allow you to pause updates for up to 35 days. This will prevent forced restarts and let you install updates at your convenience.
To pause automatic Windows updates on your PC:
- Press Windows + I to open the Settings app and select the Windows Update tab.
- Click the Pause for 1-week button on your right.
- To pause Windows updates for over a week, click the tiny arrow next to Pause updates and select your preferred option.
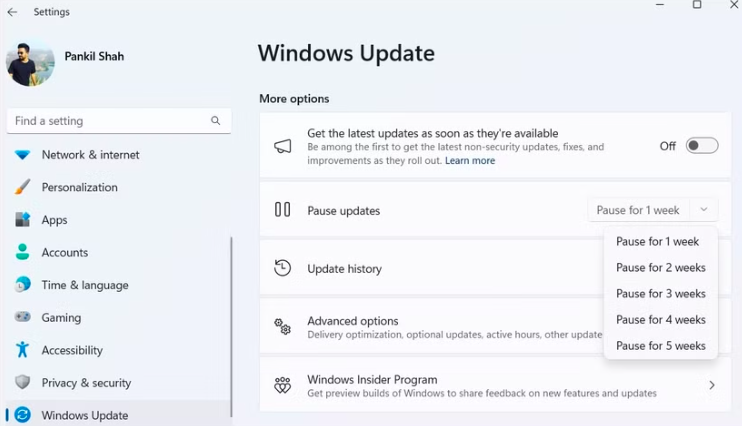
Once you’ve paused the updates, you’ll see a Resume updates button. Click it whenever you’re ready to download and install pending updates.
Modify Group Policy Settings or Edit Registry Files to Disable Forced Restarts
Those using a Professional, Education, or Enterprise edition of Windows can also take advantage of the Local Group Policy Editor to avoid forced restarts. This way, your PC will only install updates when you restart it. Here’s what you’ll need to do:
- Press Win + R to open the Run dialogue box.
- Type gpedit.msc in the box and press Enter.
- Use the left pane to navigate to Computer Configuration > Administrator Templates > Windows Components > Windows Update.
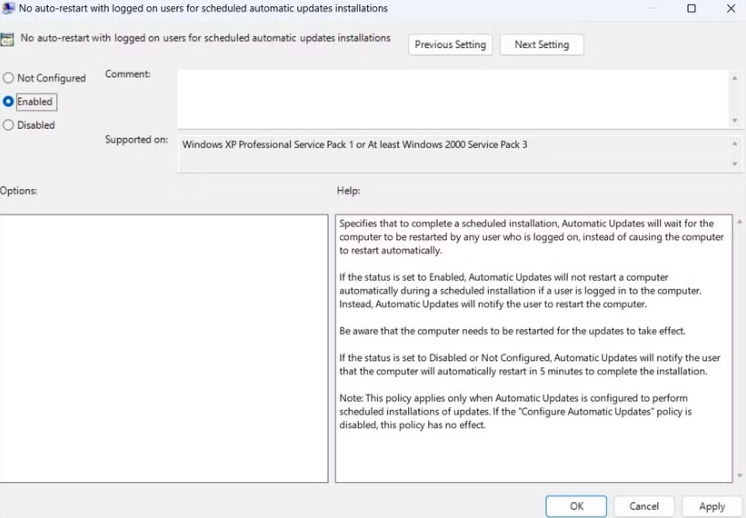
- Double-click the No auto-restart with logged-on users for scheduled automatic update installations policy on your right.
- Select the Enabled option and hit Apply followed by OK.
If you’re unable to use the above method because your PC is running Windows Home edition, you can use the Registry Editor to make the same changes.
However, before proceeding, make sure to back up all registry files, as incorrect changes can render your PC inoperable. Once you’ve done that, follow these steps:
- Open the Windows search menu, type registry editor in the text box and press Enter.
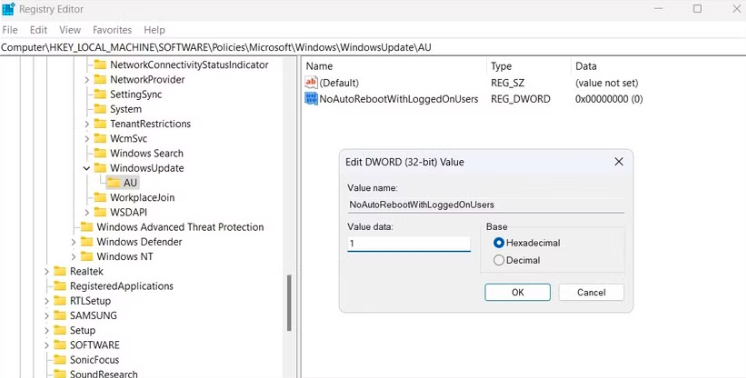
- Use the left pane to head to HKEY_LOCAL_MACHINE > SOFTWARE > Policies > Microsoft > Windows > WindowsUpdate.
- Locate AU within the WindowsUpdate key. If you can’t find it, right-click on the WindowsUpdate key, select New > Key, and name it AU.
- Right-click on the AU key and select New > DWORD (32-bit) Value. Name it NoAutoRebootWithLoggedOnUsers.
- Double-click the newly created DWORD, enter 1 in the value field and hit OK.
- Restart your PC for the changes to take effect.
With the right settings in place, you can control when and how updates are installed on your PC, avoiding inconvenient forced restarts and unexpected interruptions. However, you shouldn’t delay updates for too long. It’s important to keep Windows updated, as these updates often include critical security patches, bug fixes, and performance improvements.
